Calibrating Your Own Camera
You will need:
A fisheye camera.
A printed calibration pattern glued or taped onto something flat and solid, for example, the pattern available here: https://github.com/opencv/opencv/blob/4.x/doc/pattern.png.
A ruler or other measurement device.
The pyfisheye library installed (pip install pyfisheye).

Procedure
It is vital that the calibration pattern remains perfectly flat during the entire procedure. A small amount of tape on each corner is acceptable - but don’t obscure too much of the pattern.
Next, count the number of rows and columns in your calibration pattern. For the OpenCV pattern linked above:
The pattern should be oriented portrait with the text at the bottom.
This is an unambiguous pattern — the corner detection order remains consistent regardless of orientation.
The number of rows corresponds to the number of vertical inner corners.
The number of columns corresponds to the number of horizontal inner corners.
Measure the width and height of one square in the pattern using your ruler. These may differ, so record them carefully:
Width corresponds to columns.
Height corresponds to rows.
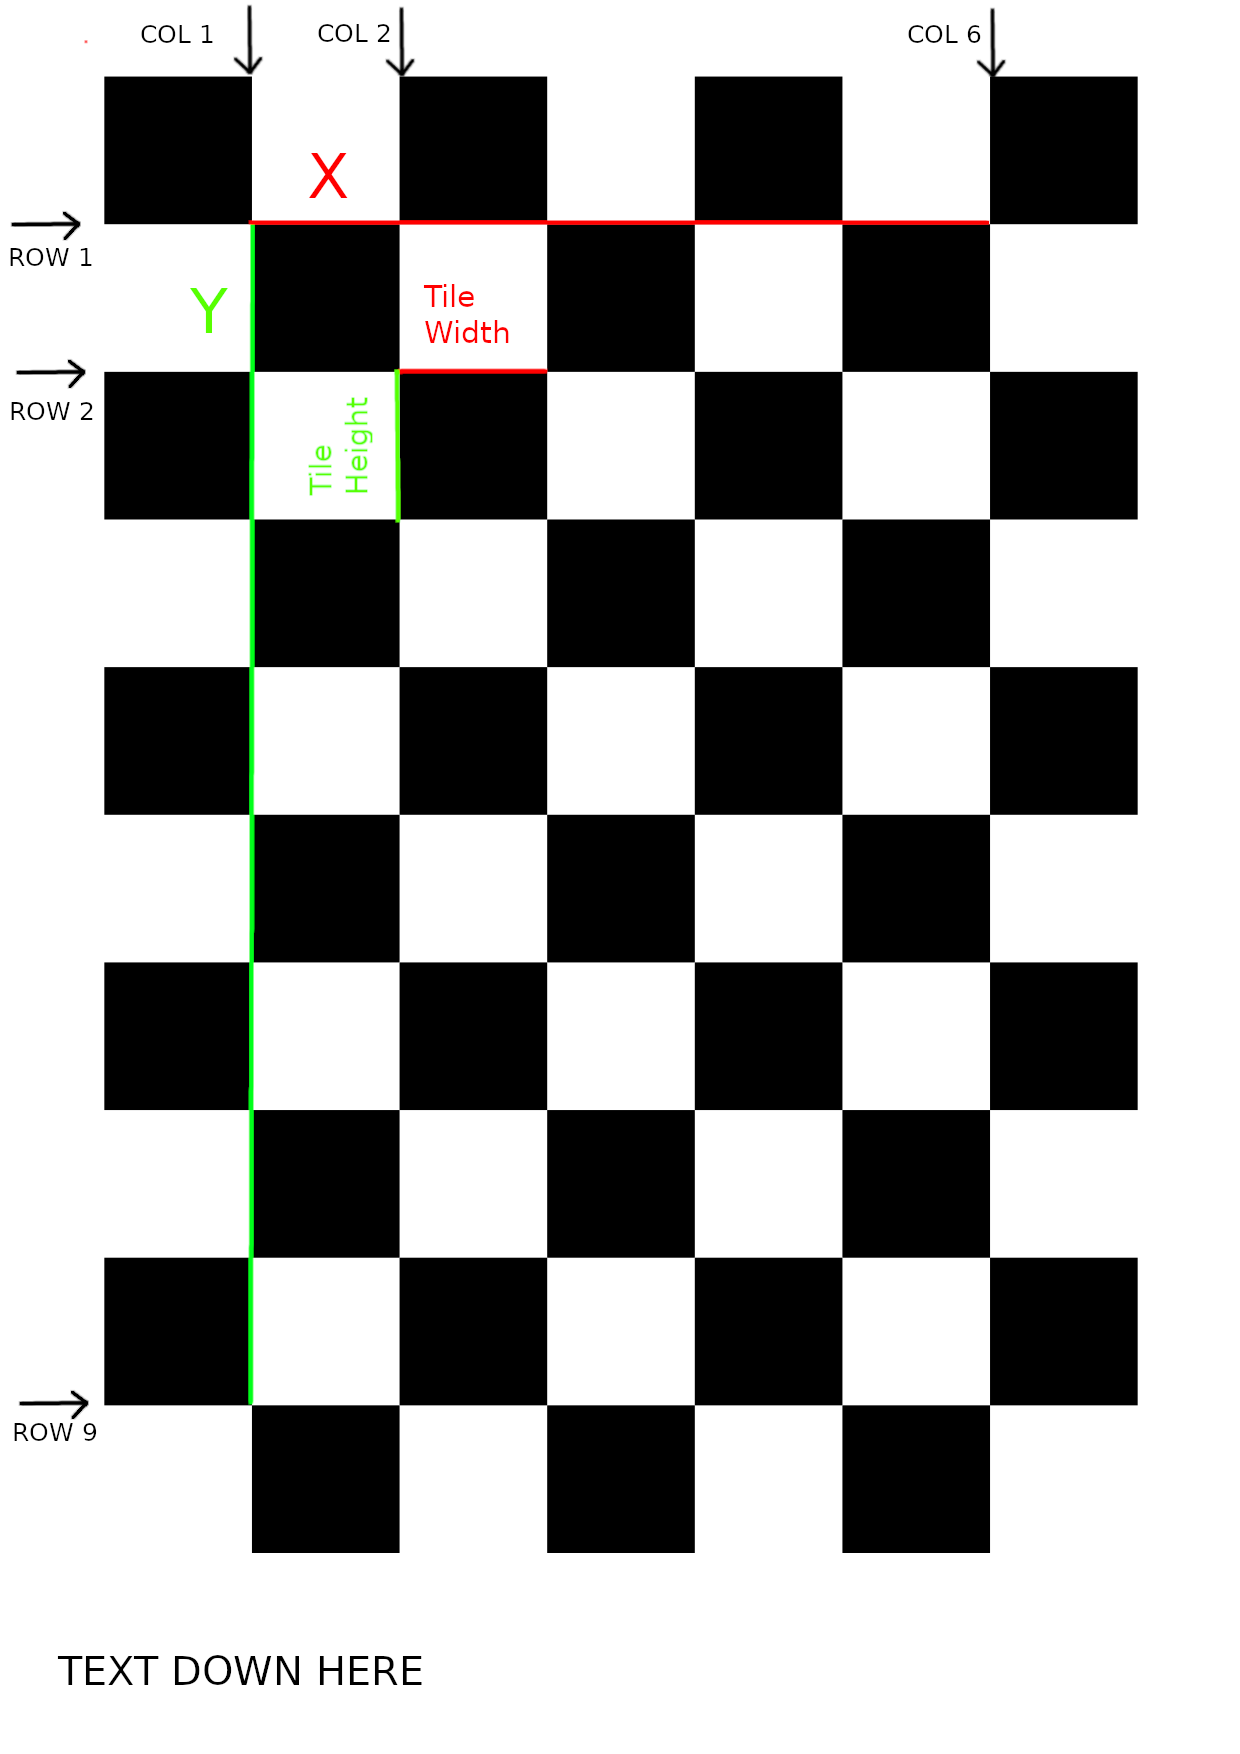
For example, the OpenCV pattern printed on A4 paper has squares approximately 24 mm wide and tall. It is recommended to measure your printout yourself.
Capture images of the pattern using your fisheye camera with the following tips:
Do:
Keep the pattern fully within the image boundaries.
Move the pattern slowly or hold it still to avoid motion blur.
Keep the pattern close to the camera (between 5 and 30 centimeters) to maximize visible distortion.
Capture 10–30 images with various pattern positions and orientations.
Explore the full field of view, especially near edges.
Use uncompressed or lossless image formats if possible.
Don’t:
Use video or high-frequency streams with hundreds of images.
Hold the pattern far from the camera where distortion is minimal.
Take photos in poor lighting or with grainy/dark images.
Change image resolution across captures.
Allow the pattern to fold or bend — it must remain planar.
Cover the pattern with your fingers.
Review your dataset and remove any poor-quality images before proceeding.
Quick Calibration
To quickly check if your images are suitable for calibration, run a quick calibration with a small distortion centre search grid size:
python -m pyfisheye.scripts.calibrate --show-results 0 --show-corner-det 0 \
    --save-results results --save-corner-det results \
    --save-calibration-to results/calibration.json \
    --distortion-centre-search-grid-size 10 \
    -pw <square height in metres> -ph <square width in metres> -pr <rows> -pc <columns> \
    <path to image 1> <path to image 2> ...
After completion, the results directory will contain:
The polynomial modeling distortion (mapping ray’s z coordinate as a function of radial pixel distance).
The 3D orientation and position of calibration patterns.
Annotated input images showing detected corners (or no annotations if corners were not found).
Reprojection images of 3D corners onto original images.
Undistorted (perspective) images of calibration patterns — straight lines indicate accurate calibration.
A JSON file with calibration parameters usable t>o create a Camera instance.
The mean and standard deviation of reprojection error (in pixels) will also be displayed. Generally:
For 4K images, a mean error under 5 pixels is good.
For 720p images, a mean error under 1 pixel is good.
Note: This initial reprojection error may be higher since the distortion centre has not yet been refined.
Refine Distortion Centre
Refine the distortion centre by running the calibration again with a larger grid size (e.g., 100). This typically takes 5–10 minutes.
Tip: Close other CPU-intensive applications to allow pyfisheye to use maximum available CPU, as calibration is heavily vectorized.

Once complete, the camera is calibrated. See Projection for more information about using the camera model.
Sample results
Todo
Insert sample images of calibration results.